· · ·
What Paperclip is, and why a proper local setup matters
Website: https://github.com/paperclipai/paperclip
Paperclip is not another “agent framework” or a fancier chat window. It is an open-source control plane that treats agents like employees: org chart, goals, heartbeats, budgets, governance, audit trail — all in a dashboard that looks deceptively like a task manager.
This framing is exactly why it’s spreading so fast among one-person startups and devs shipping with AI — it pushes you toward repeatable operations instead of “20 terminals and vibes.” Paperclip’s own README literally calls out that pain: lots of simultaneous agent sessions, losing track of ownership, and wanting agents to run autonomously while still being auditable and budget-limited.
On GitHub, Paperclip is already sitting at roughly 48k stars and 7.7k forks and has frequent releases (for example, an April 4, 2026 release is visible on the repo page). That kind of adoption curve is rarely noise.
· · ·
Paperclip in one breath for builders
Paperclip (maintained by PaperclipAI) is a Node.js server + React UI that orchestrates multiple AI agents toward business goals, lets you assign work through a ticket-like system, and gives you runtime primitives that matter in production: scheduled heartbeats, cost tracking, and budget enforcement.
The repo’s feature list is the tell here. It’s built around “business primitives,” not “prompt primitives”:
- Heartbeats (agents wake on a schedule and act).
- Cost control (monthly budgets per agent and hard-stop behavior).
- Governance (you act as the board — approve hires, override strategy, pause or terminate agents).
- Multi-company isolation (one deployment can run multiple companies with data isolation).
That’s also why it stands out for founders and solo operators: it is one of the first open systems trying to make “agents running a company” feel like operating software, not a pile of disconnected sessions.
· · ·
The setup philosophy — clean Ubuntu, local-first, then expand safely
You picked Ubuntu 24.04 LTS as a clean baseline, and that choice is rational for one-person startup ops. A fresh OS gives you fewer unknowns and fewer dependency ghosts, especially for a fast-moving TypeScript monorepo with pinned tooling. Paperclip itself is explicit about requirements and is opinionated about package management.
You also picked the right sequencing:
- nvm first (control Node versions without poisoning system packages).
- Corepack next (make pnpm versioning deterministic).
- pnpm because Paperclip pins pnpm and expects it.
- PM2 to daemonize it, free the terminal, and auto-start on boot.
- Later: Tailscale for remote access without opening port 3100 to the public internet. Paperclip’s own docs and FAQ explicitly recommend this solo-founder pattern.
· · ·
The “clone-first” install path I’d recommend
Here’s the honest reality from the upstream README: Paperclip documents two official starting paths.
- Quickstart:
npx paperclipai onboard --yes(no clone required). - Manual dev: clone +
pnpm install+pnpm dev.
So your “clone the repo, then install from there” preference is not the README’s fastest path — but it’s the better path for developers who care about control, auditability, and later running authenticated modes from built source.
Two GitHub-backed reasons make the clone-first path worth considering:
- There have been recent reports where certain authenticated-mode UI assets were missing in the npx-distributed bundle, while cloned-source dev runs worked because the UI is built from source.
- The repo’s own DEVELOPING guide increasingly pushes “repo-local” commands like
pnpm paperclipai runfor first-time local installs, including auto-onboarding and doctor checks. That is a strong signal about the maintainers’ intended “golden path” for hands-on builders.
· · ·
The actual commands, with the rationale baked in
Below is the flow you essentially followed on your Ubuntu 24.04 LTS desktop, rewritten cleanly for other devs (and with placeholders instead of your username).
Install nvm, then provision Node
nvm exists for one job: quickly install and switch Node versions per machine and per project without smashing your base OS. That matters because Paperclip requires Node.js 20+ and you do not want Ubuntu’s default Node to be the hidden variable that breaks your install six weeks later.
  # Install nvm (from the official nvm repo)
  curl -o- https://raw.githubusercontent.com/nvm-sh/nvm/v0.40.1/install.sh | bash

  # Reload shell
  source ~/.bashrc

  # Install a supported Node (LTS is a sane default)
  nvm install --lts

  # sanity check
  node -v
  npm -v
Paperclip’s repo requirement is “Node.js 20+,” so any current LTS is fine as long as it’s >=20.
Enable Corepack, then activate pnpm
Paperclip pins pnpm via packageManager (pnpm@9.15.4 currently) and explicitly requires pnpm 9.15+. If you ignore that and freestyle pnpm installs, you’re choosing chaos for no benefit.
Corepack is shipped with Node (through Node 24.x and up to but not including 25.0.0 per the Corepack repo), and its whole reason to exist is deterministic package manager versions. Practically: “Corepack enabled” means “pnpm will match what the repo expects.”
  # Enable Corepack shims (pnpm/yarn)
  corepack enable

  # Activate a pnpm version compatible with the repo
  corepack prepare pnpm@9.15.4 --activate
  pnpm -v
Clone the repo, install dependencies, run dev
This is the “I want control and visibility” path.
  git clone https://github.com/paperclipai/paperclip.git
  cd paperclip
  pnpm install
  pnpm dev
That is exactly the manual install path documented in the README.
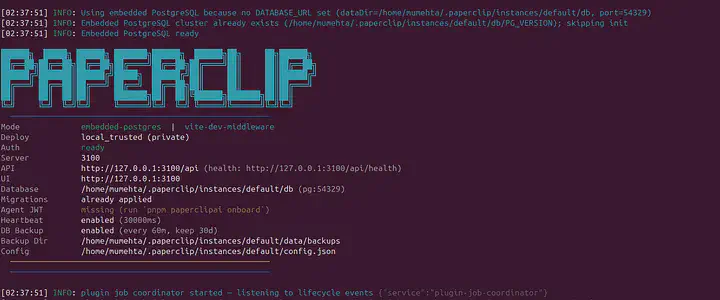
When you run locally, Paperclip defaults to embedded Postgres and local file storage — no external DB required. The embedded DB lives under ~/.paperclip/instances/default/db when DATABASE_URL is unset, and local storage defaults under ~/.paperclip/instances/default/data/storage.
· · ·
A better “first-run” command than pnpm dev
A better first-run command, and the one that aligns more closely with the maintainers’ recommended flow, is:
  # from inside the repo
  pnpm paperclipai run
paperclipai run auto-onboards if config is missing, runs paperclipai doctor with repair enabled, then starts the server only when checks pass. That’s a much more “ops brain” way to launch it than raw pnpm dev.
(You can still use pnpm dev for the developer experience and the watch loop. Just don’t pretend watch mode is the same thing as a run command designed to keep you out of trouble.)
· · ·
Keep it running like a real service with PM2
You chose PM2 for exactly the right reason: you want to stop babysitting a terminal tab, you want start/stop controls, and you want auto-start on reboot. That’s literally what PM2 documents as a core feature — it generates startup scripts and persists your process list across restarts (pm2 startup, then pm2 save).
· · ·
The minimal PM2 workflow that actually survives reboot
  npm install -g pm2

  # start Paperclip (from the repo directory)
  pm2 start "pnpm dev" --name paperclip

  # generate system startup instructions
  pm2 startup
  # you get sudo env PATH=$PATH....
  # copy this command and run before your run pm2 save as mentioned below.

  sudo ... (complete command you get from pm2 startup...)

  # IMPORTANT: run the command PM2 prints (often with sudo).
  # Then persist process list:
  pm2 save
PM2’s docs explicitly call out that pm2 startup generates the startup script and that pm2 save freezes your process list for restarts.
· · ·
The nvm gotcha — why your “PATH injection” mattered
When Node is installed through nvm, the Node binary typically lives under your home directory, not under /usr/bin. A system startup unit might not inherit that, so PM2 prints a command that often includes an env PATH=... prefix. A common set of steps (including the printed env PATH pattern) is documented in community PM2 daemonization guidance.
This is exactly why your history shows the
  sudo env PATH=…
  pm2 startup systemd -u <user> — hp /home/<user>
pattern. Without it, “PM2 works in my shell” turns into “PM2 can’t find Node on boot.”
· · ·
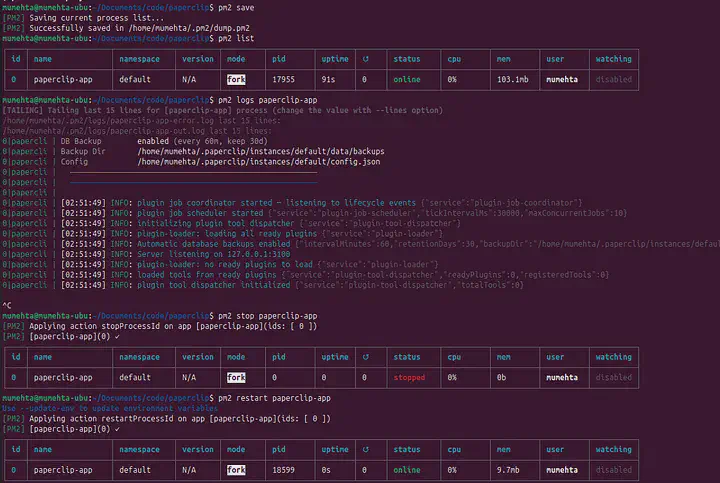
Daily control commands devs actually use
  # list pm2 configured services
  pm2 list

  # logs of paperclip pm2 service
  pm2 logs paperclip

  # restart paperclip service
  pm2 restart paperclip

  # stop paperclip service
  pm2 stop paperclip
· · ·
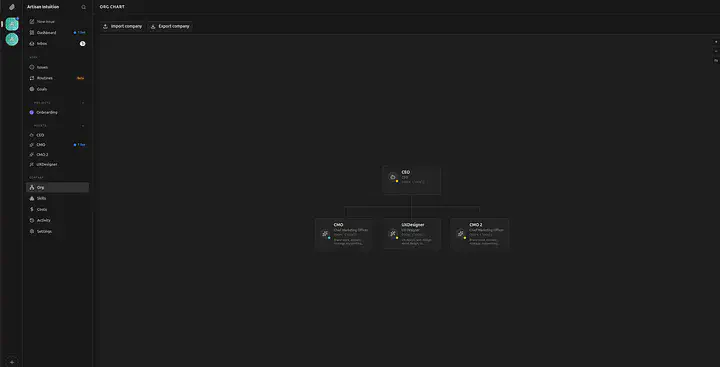
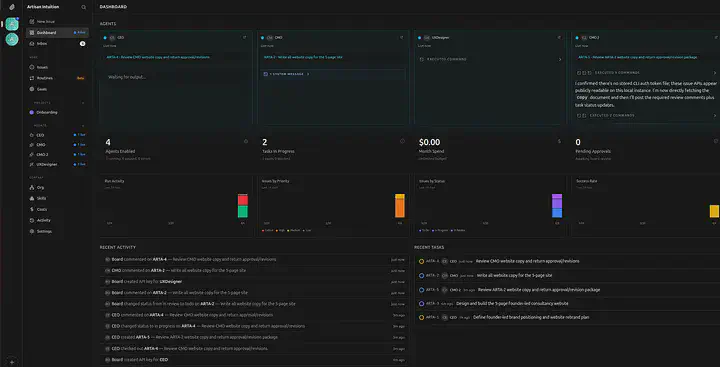
Paperclip on your System

· · ·
Remote access extension — do it with Tailscale, not “open port 3100”
Your plan to add Tailscale as an extension is the correct posture, and it’s not just “nice to have.” Paperclip itself tells solo founders to use Tailscale for access on the go, and its DEVELOPING guide includes a Tailscale-auth dev mode.
· · ·
What Paperclip considers safe-by-default
Paperclip uses deployment and auth modes. Two upstream details matter here:
- Local trusted mode is designed for loopback-only access. Binding to
0.0.0.0requires authenticated mode - Paperclip has an explicit check around this. - The repo explicitly documents a
--tailscale-authdev mode that runs asauthenticated/privateand binds to0.0.0.0for private-network access.
So the advice is:
- Start local on
127.0.0.1until everything works. - When you need remote access, do not expose port 3100 publicly. Switch to private-network authenticated mode via Tailscale.
· · ·
The commands worth including
From the DEVELOPING guide:
  # private-auth dev mode, binds to 0.0.0.0 for private network access
  pnpm dev --tailscale-auth

  # allow extra private hostnames (example shown in upstream docs)
  pnpm paperclipai allowed-hostname your-machine-name
Both commands and the rationale (authenticated/private + bind address + private hostnames) are documented upstream.
The important takeaway is simple: onboarding and binding behavior is not arbitrary — local_trusted plus a non-loopback host is intentionally blocked, and that should be treated as a safety rail, not an inconvenience.
· · ·
Commands execution to help installing step by step
  gh repo clone paperclipai/paperclip
  sudo apt update -y && apt install curl -y
  sudo apt update -y
  sudo apt install curl -y
  curl -o- https://raw.githubusercontent.com/nvm-sh/nvm/v0.40.1/install.sh | bash
  source ~/.bashrc
  command -v nvm
  nvm --version
  nvm install --lts
  nvm current
  nvm set-colors cgYmW
  npx
  nvm -v
  node -v
  npm -v
  npx -v
  pnpm -v
  corepack enable
  corepack prepare pnpm@9.15.0 --activate
  pnpm -v
  corepack prepare pnpm@latest --activate
  pnpm -v
  ls
  cd paperclip/
  pnpm install
  pnpm build
  pnpm dev
  sudo npm install -g pm2
  npm install -g pm2
  pm2 start "pnpm dev" --name "paperclip-app"
  pm2 startup
  sudo env PATH=$PATH:/home/<trimmed off>
  pm2 save
  pm2 list
  pm2 logs paperclip-app
  pm2 stop paperclip-app
  pm2 restart paperclip-app
· · ·
Finally It’s in Action — So Satisfying
Paperclip in Action, you give the task and it creates the Organisation. CEO is appointed first and it hires other Agent employees. Working in tandam towards the given goal. Look here